
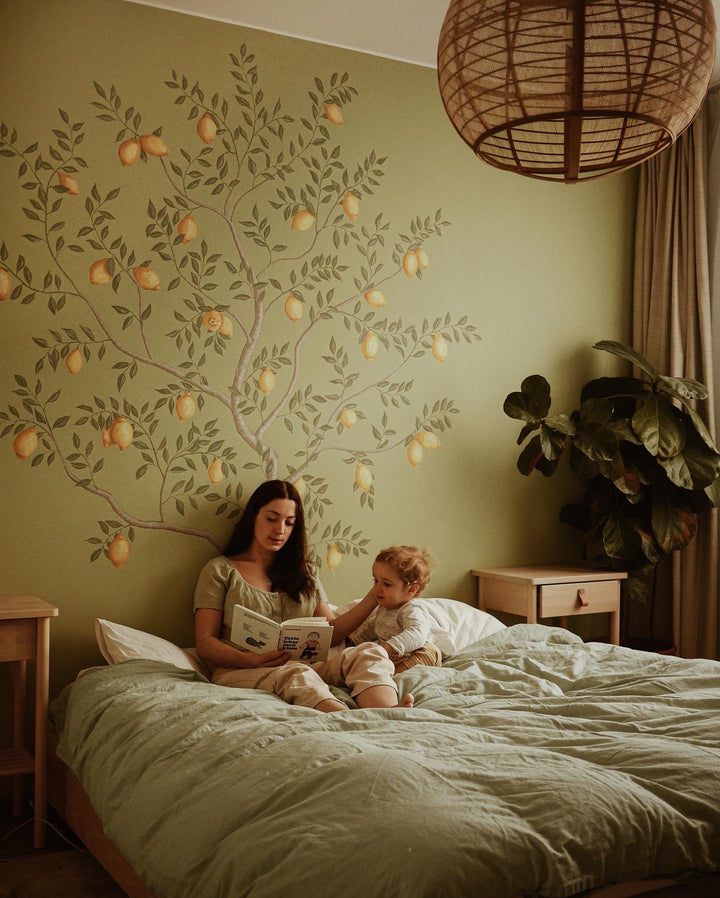
I love inspiring people to be braver in their creativity! Some people find simply painting a wall in a new colour a little scary, and the thought of painting a mural a lot scary. The fact however, is that it doesn't have to be that difficult! In this blog post I take you through all the steps I did to finish my lemon tree mural. I hope you enjoy it!
I have painted two murals, both lemon trees. The first one was more abstract and less realistic while with the second one I wanted to try and paint a more realistic tree inspired by traditional botanical illustrations.

While I do recognise that the result of your painting will be dependent on your own painting and drawing skills, I truly believe that you will be happily surprised at how stunning the mural comes out once you take a step back and admire it. It doesn't have to be realistic or look perfect, the overall effect is going to be beautiful. And let's not forget - if it doesn't, you can always paint over it again. ;)
For my first mural I used regular type wall paint. I bought a couple smaller sample cans and used these to mix my own shades. For my second mural, I wanted plastic free eco friendly paint and chose Auro natural paints. I purchased a bunch of smaller sample colours (different shades of grey, green, blue-green, white and red) and two larger cans with green and yellow. I used a paint roller to paint the green background first, and then I used regular oil painting brushes I had at home for the actual tree.
|
After the green background paint had dried, I drew an outline with chalk. This is the best advice I can give you since you can keep erasing and remaking your tree until you are completely happy. I mainly focused on getting my tree in a nice shape with symmetrical yet realistic branches, and an even spread of lemons. I didn't draw any leaves or other small details. |
 |
|
|
When I was satisfied with the chalk outline I began painting the lemons in a solid colour, just to get the shapes right. As you can see on the lemon to the left, I made sure that some lemons would be partially covered by leaves. |
 |
|
|
I know it might be a little counter intuitive to paint the lemons first and that the first instinct is to paint the tree trunk and branches. The reason I start on the lemons is that these are the main focal points in the tree. If the trunk and branches come first, the lemons (and leaves) are either painted next to or behind the branches, not in front of them. |
 |
|
|
Once I had finished that part, it was time to start working on the shades and structure on the lemons. I studied real lemons and looked at botanical illustrations to get inspiration. |
 |
|
|
One tip I think is important is to work with the natural light you have in your room. In our bedroom, the window is to the right of this wall. Therefore, I made sure that the shades were to the left, and that it looked like the light is reflected on the right side. |
 |
|
|
Once I was happy with the lemons I moved on to the leaves. I used a darker shade of green and painted all the leaves solid before starting on shading and highlighting. |
 |
|
|
In hindsight, I probably could just as well have painted them with stems, shadows and highlighted areas straight away and saved myself a lot of time, but I wanted to see that I was happy with the amount of leaves and their placements before I invested in all that work. Anyway, I applied the same logic as I did with the lemons and placed shadows to the left and highlights to the right. |
 |
|
| Detail shot of lemons and leaves. As you can see, close up the lemons and leaves don't look that detailed. When you work on shades and highlights, step back regularly to see how the details look from a distance. Otherwise it's easy to get a little blind when you're working on the details. |  |
|
|
Now to tying it all together with branches and a trunk! I began painting a darker outline and then painted it solid greyish brown. |
 |
|
|
After that I started adding shades and texture. For this I used a super simple technique where I just painted horizontal brush strokes up and down the trunk, slightly bent to mimic the round shape of the trunk/branches. I applied darker brush strokes on the left side and brighter on the right. |
 |
|
| I also added some extra details on the trunks such as broken off branches and I played around with shading where the branches meet the trunk, so that some look like they come out behind the trunk (the lower branch here) and some in front (the upper branch). I kept on painting layers of strokes until I was pleased with the look. Again, regularly stepping back to inspect is key! |
 |
That's it! That's all the steps it takes to make a lemon tree mural. Granted, it takes a lot of time and patience... Personally I never reached a point where I felt I was 100% finished, I could have gone on so much longer adding more details and making it look more realistic. But I kind of like it this way! It means I can decide at any point to pick up my brush again and paint some more on it.

I hope you enjoyed this post and that you feel encouraged to try out painting a mural for yourself if you have been dreaming about it!


I hope you'll like your stay here in my corner of the Internet!
Love, Fanny
Comments
Hello @Jenna,
I’m afraid I wasn’t entirely happy with the shade of green I chose so I ended up mixing in some of my sample shades. So I can’t help you unfortunately!
Best of luck,
Fanny aka Createaholic
Hi! What shade of green did you use by Auro Natural Paints?
Absolutely love this! Thank you so much for sharing the steps for this. In a few months I shall be trying this out in my back bedroom which faces north. I was going to paint the whole room a sunny mellow, yellow. I shall add a feature wall behind the bed now with a gorgeous lemon tree. 🤩
I absolutely love the creativity and bravery behind painting murals, and your lemon tree mural is truly inspiring! Your detailed step-by-step guide, especially focusing on the natural light and the strategic approach to painting lemons and leaves, makes it feel achievable for someone like me who’s not an artist. Thanks for sharing your artistic journey and encouraging us to unleash our creativity at home
Hi @Chris! I used Auro Natural Paints. I have linked them in the beginning of the blog post. :)
Looks great! Which paint did you use?
Very beautiful. Very brave. Well done.🌺🌺🌺