

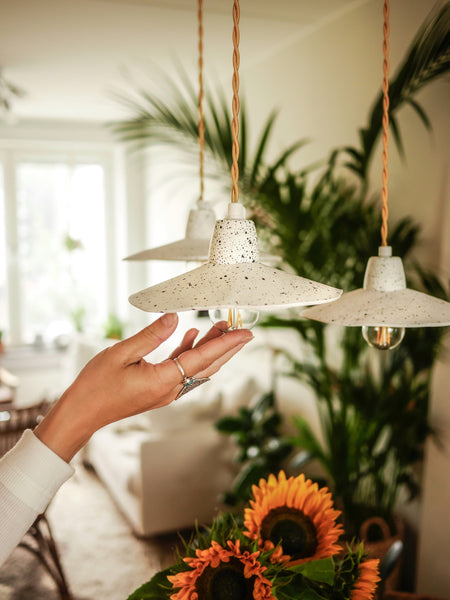
I have a thing for making my own lamps. It has been like this for years, ever since we learned how to connect wires to make lamps in school when I was 10, and I have made plenty over the years. When we moved in early summer, I started thinking about what lighting I'd like above our dining room table. In our previous apartment we had a different homemade lamp, but it was time for something new!
I've had several requests for a tutorial on how I made these lamps but before I start I just want to emphasize that I am in no way a licensed electrician. All experts advice against making your own lamps and doing any kind of wiring, in case something would go wrong and since it's a potential fire hazard. I don't want to pretend that it is without risks. So in other words, I guess I want to say that you make your own lamps at your own risk. Having said that, it really isn't that difficult! :D This tutorial won't focus on the electric part of making the lamp (check Youtube if you're not familiar with how to connect wires) but rather on the lampshade part.
For this project I used:
- 3 porcelain sockets (E27)
- Plug
- DAS Air-Hardening Modeling Clay (white)
- Golden fabric covered twisted electric wire/cord (6 meters approximately)
- Terminal block/strip (unclear about the English term for this, but basically something to connect wires into so you can split one cord into many)
- Electrical tape
- Paper
- Scissors
- Hard, thick paper/cardboard
- Baking roller
- Fine sandpaper
- (small rubber ring/band)

Step 1

Cut a 10-15 cm long cord of your wire and connect it on one end to your plug and the other end to your terminal block.

Step 2

Cut three more cords, each between 120-180 cm long (measure how low you want your pendants to hang, counting the length from the plug to the hook in the ceiling to the lamp). Insert the wires into the other end of the terminal block. This is a little tricky since it's tight with three strands into one hole - I used electrical tape to keep everything in place.
Step 3

Take a piece of clay and cover the part where the cords connect. Simply press the clay around the connected part. This hides this ugly part and helps to keep the cords in place!

Step 4
Time to start working on your lampshades!

Cut out a paper circle (~16-20 cm in diameter). Place one of your sockets in the middle and gently draw a circle around it in the middle of the paper circle. Draw a new circle inside the smaller one, making it about 3mm smaller all around.
Cut into into your paper circle towards the middle and then cut out the smallest middle circle. Then cut out a "slice" of the paper cutout. Start small and expand the slice while you test the shape of your paper lampshade. Close the gap to see how flat or tilted your lampshade will be.
Step 5

Take a piece of the clay and use a baking roller to roll out a thin piece, large enough to match your paper cutout. I made mine about 3mm thin - any thinner and it would have become too fragile, but too thick and it would have looked a little bulky.
Cut out your clay lampshade. Where the gap is, add an extra centimetre on one side so that the sides will overlap once you close the gap.
Make two more.
Step 6

Use your paper cutout to make three sturdier versions out of thicker paper, or even cardboard. Tape the gaps shut and try to make the paper lampshades as even as possible.
Step 7

Lay the clay on your paper lampshades and close the gap on your clay pieces. Dip your fingers in water and smoothen the surface, especially where the clay overlaps.
Let dry for 24 hours.
Step 8

Gently lift the clay lampshades off the paper ones. Take a fine sandpaper and carefully smoothen the surface so they become really soft and smooth and repeat around the edges until you are happy.
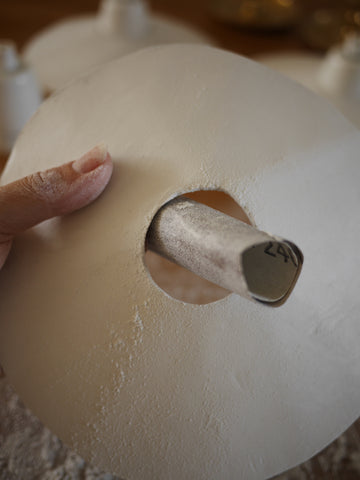
This part is a little trickier. Use the sandpaper to make the holes in the middle the perfect round shape and size for your sockets. The holes need to be smaller than your sockets so that they can rest on them.
Step 9

My porcelain sockets were shiny which clashed with the matte lampshades so I used the sandpaper to remove the glaze. Then I used dark brown acrylic paint and painted tiny spots and dots on them. I did the same with the lampshades.
Step 10
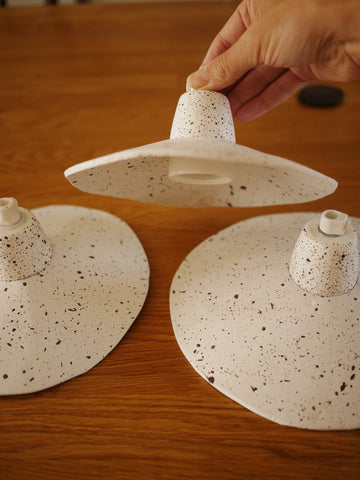
When you are happy with the look of your lampshades and the shades fit your sockets, it's time to connect the cords to the sockets. Be careful so you don't accidentally break your lampshades!
Side note: I had some white rubber rings at home which I put on my sockets underneath the lampshades as an extra support for them. You can use a discrete rubber band for this.
Step 11

Your pendant lights are basically done! Time to hang them. I did this by drilling in my ceiling and attaching white hooks. I then tied knots around the cords so they had loops which I hung on the hooks.

All done! :)

Are you new here? My name is Fanny Zedenius and I run a fiber art business in Sweden called Createaholic. You can find my two best selling books about macramé here and you can check me out on Instagram here. On this website I sell all the supplies you need to get started on your fiber art journey - be it macramé, weaving, crocheting or something else! I also occasionally post new blog posts where I share some of the creative projects I work on.
I hope you'll like your stay here in my corner of the Internet!
Love, Fanny
Comments
Thank you so much for sharing and it’s so well explained
@Keri Sue Thank you so much! Yes definitely pleating could work, just might be a bit more work. :) And I love the cracked pepper idea! Genius indeed!
I adore these! I also used to make lamps (little table cylinder lamps with rice paper)and I was looking for a tutorial on little ceramic shades, I may even try to pleat them? Do you think that would work?
My friend @mikylacreates works with clay and she rolled some fresh cracked pepper to make the speckling, which is genius!
I like the brown spots, kinda like a bird egg. & I gotta say you made something I appreciate very much.
This is brilliant. I am working on making 3 pendants now.
air dry clay -by definition – is made not to crack when drying . and it won’t shatter like fired clay.
I don’t know which kind of air dry clay she uses ( please comment) but here in New Mexico we have a low fire fiber clay ( “Sheepdog” at NM clay) that can be used as air dry clay .
thank you very much for sharing your creation and instructions to replicate.
kind regards
Annie Sousa
@Cee:
Yes, it’s 1.5 years later and they still look like they’re new! :)
/Fanny
These look beautiful. I was thinking of doing this too, would you happen to know if they’ve held up without cracking?